CollectiveAccess, http://collectiveaccess.org/, is an open source Collection Management System that is scalable, web-based and suitable to manage many museum collections.
One great thing about open source systems is you can get it running locally to evaluate the system and do some local tweaking and development.
With CA, you could use the online demo (http://demo.collectiveaccess.org/index.php/system/auth/login) - but really, that barely gives a taste. You need to get running locally.
CA has installation profiles available for download that will run locally on your Windows or Mac.
Alternatively, a better option might be to get the server and run it through MAMP (Mac OSX) or WAMP (Win 7+). This will properly replicate a testing environment on your computer, though should of course not be used for production. The download files are available on the CA website: http://collectiveaccess.org/download
There is good documentation for how to run and install both the above options available on the CA wiki: http://docs.collectiveaccess.org/wiki/Installing_Providence
What I’m going to do in this blog is get CA running as a Vagrant Box, nicely synced up to a fork of Providence (CA’s backend cataloging app) from GitHub.
If you like to do some basic developing I highly recommend getting into Vagrant https://www.vagrantup.com/. It really makes setting up development environments more portable and reusable.
Also, get into GitHub (http://github.com), if you’re not already.
This blog will assume that you have Vagrant running on your computer, and you’ve forked Providence: https://github.com/collectiveaccess/providence on GitHub and got a branch running with your profile.
If you’re interested in making your own flavor in Vagrant, there’s a great tutorial here: https://scotch.io/tutorials/how-to-create-a-vagrant-base-box-from-an-existing-one - this is where I learnt how to make Vagrant boxes in the first place.
Ok, start by booting terminal and creating a folder where you’d like to have this running on your machine.
mkdir providence

vagrant init
Cool. This creates a vagrant file, we’ll need a nice base vagrant box so that we have everything we need to run CA. So select something that will support Apache, PHP and MySQL. I’m going to choose the default 32-bit Ubuntu 12.04 install (see https://atlas.hashicorp.com/boxes/search for available boxes for some other options). To install this base box:
vagrant box add hashicorp/precise32
Wait for the magic as in one line of code we install a full Ubuntu profile into our vagrant folder. If you are on Australian non-NBN internet, this will take a little while. Go make a coffee.
Start the web server through Vagrant in your terminal:
vagrant up
Now SSH in:
vagrant ssh
Wait for the usual start messages then get Apache, MySQL, PHP and a few other useful tools installed:
sudo apt-get update

sudo apt-get upgrade

sudo apt-get install vim

sudo apt-get install apache2

sudo apt-get install mysql-server libapache2-mod-auth-mysql php5-mysql

sudo mysql_install_db sudo /usr/bin/mysql_secure_installation

sudo apt-get install php5 libapache2-mod-php5 php5-mcrypt

sudo apt-get install php5-cgi php5-cli php5-curl php5-common php5-gd php5-mysql

sudo service apache2 restart
Now restart Apache:
sudo /etc/init.d/apache2 restart
Ok, we have now have a base web server in vagrant. We’ll need to customize this around CA install before we save a configured base box.
If there are media plugins that you’d like, as per what is listed on the CA install page (http://docs.collectiveaccess.org/wiki/Installing_Providence#Software_requirements_for_media_processing), start installing these into the profile.
Now it’s time to adjust php.ini file.
cd /etc/php5/cli/

nano php.ini
Inside the php.ini file make some adjustments as per your preferences. The fields to look out for are specified here: http://docs.collectiveaccess.org/wiki/Installing_Providence#Configuring_PHP_prior_to_installation - I’d recommend turning on errors as this is a development environment.
Now go create a MySQL database (assuming root is the username):
mysql –u root -p

create database providence;
Now exit MySQL and get back into your SSH session.
Cool, we’re ready to put in the CA code into the base of the folder.
Ok, open up your GitHub app, and clone providence to a local folder.
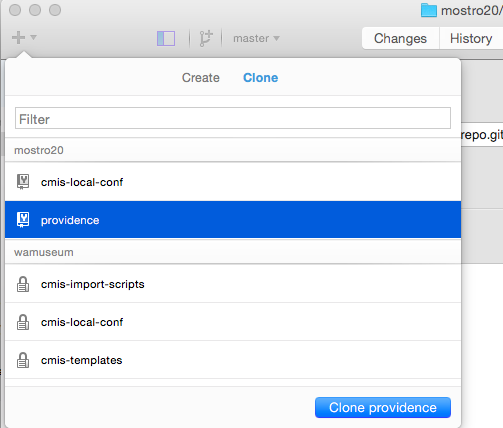
Copy the cloned repo into same folder that you’ve been configuring Vagrant.
Copy the setup.php-dist file and rename into setup.php and then configure according to the names you’ve given to database earlier in the setup.
Also you’ll need to change permissions on a few folders so they can be writable, as it’s internal dev environment, I’m happy to give it full permissions (777).
cd /var/www/

sudo chmod vagrant:www media -R

cd ../../app/

sudo chmod vagrant:www tmp -R
Or you can edit directly through the Mac or Windows OS and change the access permissions on the files you downloaded from GitHub.
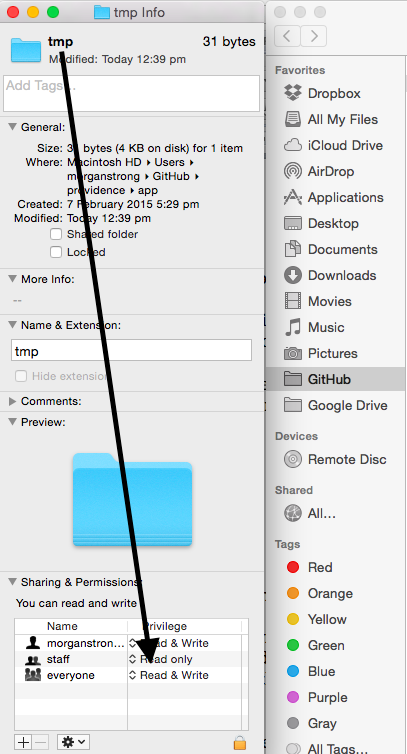
This is easier, but will mean you’ll need to do this with the files that you pulldown from GitHub each time you install a new Vagrant Box.
Ok at this point we’ll set up a new base Vagrant Box and save that. From this you’ll then be able to run local installations. If you’d like to run some installation steps first (which we’ll cover after the saving Vagrant steps), then perform these steps before you write out and save a Vagrant Box.
Save a new Vagrant box with CA information
A couple of steps now needed to set up this new box with all the necessary web application components ready to run CA. First, get the box as small as possible:
sudo apt-get clean
Then, “zero out” the drive:
sudo dd if=/dev/zero of=/EMPTY bs=1M

sudo rm -f /EMPTY
And clear out the bash history:
cat /dev/null > ~/.bash_history && history -c && exit
Now make a new vagrant box:
vagrant package --output providence.box
This creates a new Vagrant box where you can store wherever you’d prefer on your machine. But wherever it is, we’ll need to install it into Vagrant:
vagrant box add newprovidencebox providence.box
Now that the box exists in Vagrant, time to pulldown the Vagrant session and remove the Vagrant file – we’ll set up a new one with the new box:
vagrant destroy

rm Vagrantfile
Now this is gone, set up a new Vagrantfile using the command used above (in this case “newprovidencebox”).
vagrant init newprovidencebox
Set up the Vagrant file and install CA
Now we need to go on to a browser to run the installer. To do this, we’ll to initially set up the Vagrant file:
Update the Vagrant file with the name of base box that you’ve used, setup a BootStrap shell script and the forwarding port, as per the instructions on the Vagrant website. So edit the “Vagrantfile” in your favourite IDE as follows:
  # Every Vagrant virtual environment requires a box to build off of.

  config.vm.box = “providence.box”

  config.vm.provision :shell, path: "bootstrap.sh"

  config.vm.network :forwarded_port, host: 4567, guest: 80

  config.vm.synced_folder ".", "/var/www", :mount_options => ["dmode=777", "fmode=666"]
Once this is saved it’s time to Vagrant up, and get then install providence:
vagrant up
Now go into your browser and setup CA, the URL should be as follows: http://127.0.0.1:4567/install/ and enter an email and install profile, for example Darwin Core.
Keep the login details safe.
And there we have it. CollectiveAccess as a simple Vagrant box.